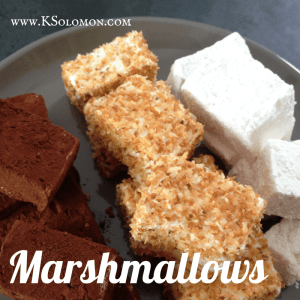
I recently shot another video for my Creativebug series on how to make homemade marshmallows. I hadn’t made marshmallows in years and I was reminded of how insanely delicious they are – not to mention ridiculous sticky fun. I’ve tweaked the recipe ever so slightly since this first appeared in Jam It, Pickle It, Cure It. Note that I am now eyeballing a host of other candy recipes after reacquainting myself with these beauties: you have been warned. Make these for all of your hot chocolate floating, campfire, and holiday gift box needs. The toasted coconut will knock your socks clear off!
DIY Marshmallows
Makes about 36 medium (11/4-inch) or 16 large (2-inch) marshmallows. Time Commitment 2 hours
These light, fluffy, and flavorful clouds kick the butt off anything jet-puffed by a wide country mile. They will stand up to stick and flame on your next campout and are dreamy when paired with a slab of chocolate and homemade (or not!) graham crackers. They’re even worth firing up the Weber on the patio just to marvel at their rich, toasty flavor. If you’re fire-toasting, make large (2-inch) marshmallows. Note that this recipe will require a candy thermometer. A stand mixer is best, but you can also use an electric hand mixer. You do not want to have to whip these by hand!
- 1/2 cup and 1/3 cup water, divided
- 3 (1/4-ounce) envelopes unflavored gelatin
- 1 cup granulated sugar
- 1 cup light corn syrup
- Pinch of kosher salt
- 1 teaspoon vanilla extract
- 1 cup confectioners’ sugar, for dusting
- 1 cup unsweetened cocoa powder (optional)
- 1 cup toasted unsweetened shredded coconut (optional)
Instructions Lightly oil the inside of an 8 by 8-inch pan with vegetable oil. Generously coat with softed confectioners’ sugar; set aside.
Pour 1/2 cup water into the bowl of a stand mixer. Sprinkle the gelatin over the water and give it a quick stir. Let stand for about 10 minutes, or until the gelatin has softened.
Meanwhile, in a saucepan off heat, combine the remaining 1/3 cup water and the granulated sugar, corn syrup, and salt. Place the pan over medium-high heat. Clip a candy thermometer to the inside of the pan and make sure it does not touch the bottom. Brush down the sides of the pan with a pastry brush (or a clean paintbrush reserved for kitchen use only), dipped in water, to gently wipe away any residual sugar crystals. Cook the mixture without stirring until it reaches 240°F (also known as the “soft ball” stage of candy making).
With the mixer on low speed, very carefully stream in the hot syrup to the softened gelatin. Add the vanilla, slowly increase the speed to high, and beat for 5 to 13 minutes (depending on the age and power of your stand mixer), until the mixture becomes very white, stiff, and sticky. You’ll know it’s done when the marshmallow pulls in strings, not sheets, from the side of the bowl.
Spread the very sticky mixture into the prepared pan using a lightly oiled spatula. With wet hands, press the batter evenly into the corners of the pan. Set aside for at least 1 hour, or until the mixture is firm and cool.
Sift the confectioners’ sugar into a shallow dish or bowl. Run a wet knife around the edge of the cooled pan to loosen the marshmallow sheet. Sprinkle some of the confectioner’s sugar on top of a large cutting board (to prevent sticking) and invert the marshmallows onto the board from the pan. Cut into 16 or 36 squares, wetting the knife often to keep it from sticking. Toss each marshmallow in the confectioners’ sugar, cocoa, or coconut until completely coated and no longer sticky.
How to Store It Store marshmallows in a single layer or in layers separated by waxed paper. They will keep for at least 1 month when stored airtight at moderate temperature.
Variations Try rolling your ‘mallows in crushed nuts or colored sprinkles. Or, fold 1 cup finely chopped cacao nibs, toasted almonds, mini chocolate chips, dried cranberries—or any combination thereof—into the stiff marshmallow mixture before spreading. Swap out the vanilla extract for almond, peppermint, orange, etc. for different flavor combinations.


